The Form Designer area allows you to create forms and customise them based on what they will be used for. You can set up and design as many forms as you like with 12+ question types such as pass/fail, drop-down, photo, signature, text-box. You can also attach multiple forms to a job, whether planned or reactive.
To design a new form that is customized to the business’ needs, select Design New Form in the top right hand corner of the Form Designer Page:
The main Form Designer page also gives options to export the form list to an excel sheet, or to add a new Form Category:
Clicking on the Design New Form button leads you to Create Form page where you can name your form, assign the form a category (form categories can be set up in the Settings -> Form Categories area), specify the form type, set the scope for the form.
The Scope section allows you to choose between three options:
- For Resources Only – these forms can be added against individual resources in the resource details page. This selection could be useful for health and safety, vetting, and compliance documents for example. Resources can also complete the forms from within the resource online portal with their own login information
- Form Library – this option means this form can be accessed by any resource or general user in the Forms Library area. When the form is submitted, a new form is automatically generated. This is great for daily forms such as meter reading, or tool inspections. The Form Access options allow you to decide if all users can access the same form once created, or if each form is for one user only once created:
- Attached to Site or Asset – you can associate this form to a site or asset. So all forms submitted will be attached to that site or asset.
- Form Access – If set to Shared, then this form can be accessed by any other user.Is set to Solo, then only the user who started the form will be able to edit the same form. Another user can still start this form from the Form Library, but it will be their own version.
You can also attach a site or asset to this form when choosing this option.
- For All Planned Schedules, Jobs, Assets, and Sites – with this option you can attach the form to any job from the Job Details page, or the Planned Schedules module. The form can also be submitted from the Site Details page, and the Asset Details page.
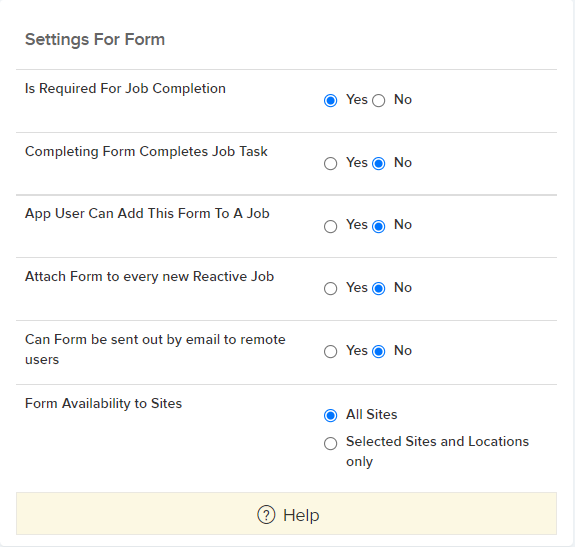
- Is Required For Job Completion – If this is set to Yes, then a job or job task cannot be completed until this form is submitted.
- Completing Form Completes Task – If this is set to Yes, then a submitted form attached to a job task, will then attempt to close the job task, provided there are no other open forms for that job task.
- App User Can Add This Form To A Job – If this is set to Yes, then an App User will have the ability to add this form to the Job, Site, Location Sub Location or Asset on the Manager & Resource App.
- Attach Form to every new Reactive Job – If this is set to Yes, then this form will be automatically attached to every new reactive job created. Note this is subject to the site availability setting – see the setting below.
- Can Form be sent out by email to remote users – If this is set to Yes, then this form will be available to be sent out by email to remote users.
- Form availability with Sites and Locations – The default is “All Sites” – so this form will be available to be added to any job, site or asset for any site / location. However, you can restrict it from being selected for only sites and locations you specify.
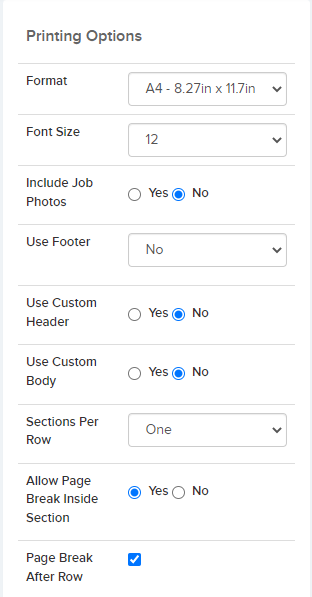
You can also specify printing options for printing off the form:
- Format – This will determine the page format the form will be downloaded as. Can be set to “A3”, “A4” or “Letter”
- Font Size – Choose the font size for printing the form questions and answers.
- Include Job Photos – You can choose to include photos at the end of the form that are attached to the associated job if there is one.
- Use Footer – Use Trackplan’s default footer, design your own or not have a footer for your form. Use the option ‘Yes default, Ignore First Page’ to have a footer on all but the first page.
- Use Custom Header – Use Trackplan’s default header for the form, or design your own.
- Use Custom Body – Use Trackplan’s default body for the form, or design your own. The Form Questions grid has a column – ‘Tag’. Create a unique tag for each question. When editing a form set the ‘Use Custom Body’ setting to Yes. A new button will appear. Clicking this button will reveal a pop-up where you can then design your own PDF report/certificate.
The question tags you created earlier in the Form questions grid will appear in the Help section. You can insert the tags which will be replaced at run time with the actual answers. - Sections Per Row – This will determine how many sections will fit on the page form left to right when using Trackplan’s default body.
- Allow Page Break Inside Section – If the sections per row is one, this lets you to avoid page breaks inside a section.
- Page Break After Row of Sections – This will determine if a page break will be used after a row of sections when using Trackplan’s default body.
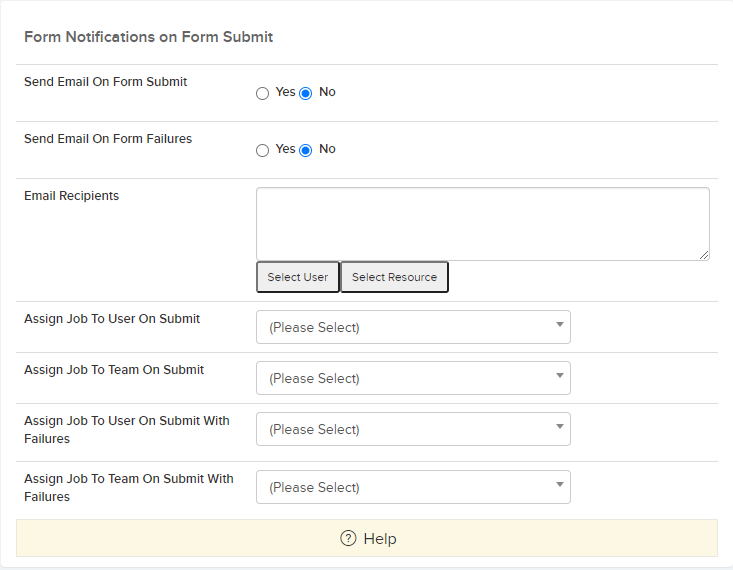
You can also set up Email Notifications:
- Send Email On Form Complete –
- Send Email On Form Fail –
- Email Recipients –
- Assign Job To User On Submit – When the form is submitted, this user will be assigned the job and notified.
- Assign Job To Team On Submit – When the form is submitted, this team will be selected for the job and all members will be notified.
- Assign Job To User On Submit With Failures – When the form is submitted with failures, this user will be assigned the job and notified.
- Assign Job To Team On Submit With Failures- When the form is submitted with failures, this team will be selected for the job and all members will be notified.
Please note that Failures take precedence over submit when User and Team are assigned to a job.
Save the form using the Save button in the top right hand corner of the page.
Once you save your new form, you will be taken to the next step which is adding your questions. There are multiple question types to choose from such as pass/fail, drop-down, photo, signature, text-box etc.
At the top-right of the Form Questions grid is the Add Questions button. Clicking this will create a new row in the grid for you to populate with the question name / title, question type, if this question is required in order to complete the form, the order number for this question, the default answer (e.g. for multiple choice), and the section*.
*Forms can be broken up into different sections. To add a section select the three dots next to the Add Question button and select Form Sections. This will display a pop-up for you to manage the form sections:
As shown above, you can also copy questions from other form. Simply select that option from the drop-down (as above) and choose the form you wish to copy from the pop-up window.
At the top of the Form Designer page you will find the Edit button which will allow you to edit the basic form information you provided on the previous page. You can also preview how the form will look to the user by selecting the Preview button.
Next to the Preview button are three dots which, when clicked, display a drop-down menu with additional options:
- Delete – this will delete the form. You will be asked to confirm your decision if you select this option.
- Form Categories – this will display the Form Categories pop-up window. From here you can manage the categories (add, edit, delete).
- Duplicate Form – this will create a new form with the same questions and sections as the current form. You can give the new form a name and select Confirm to create your new form. (Note that you will need to reconfigure any calculated fields being copied from the original form)
- Form Change History – this will display the Template Change History showing any changes made to the form over time. This grid can also be exported to an Excel sheet.


