The Settings -> Planned Linked Groups area allows you to set up groups to link planned schedules together so assets or sites added to one schedule will auto add to another. Also you can add supersede rules for smart scheduling.
Please note: Schedules must be of the same item type (site, asset or location) to exist within the same group. Also, if of type asset, they need to be in the same asset class.
You can create a Linked Group by selecting Add New Linked Group at the top-left of the page:
This will create a new row where you can:
- Assign a Linked Group Name
- Set the group to be by Site, Asset or Location
- Superseding Rules – If you turn this setting on for a group, then the scheduler in the software will try to prevent two different schedules booking jobs around the same time. For example, for a weekly schedule and a monthly schedule: due dates for a weekly schedule will respect the less frequently occurring monthly schedule which will take precedence when scheduling and booking the jobs.
- Link Schedules in Groups – If turned on, then assets, sites or locations added to one schedule in the group will be automatically added to other schedules in the same group.
Select Update to add the linked group to the list.
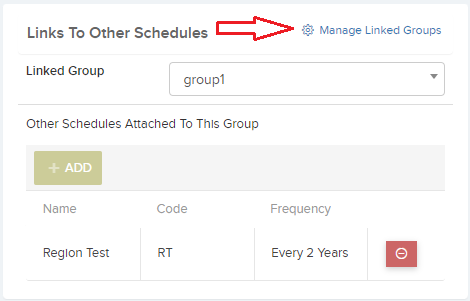
The User can also manage Linked Groups when editing a Planned Schedule. As per screenshot below click on ‘Manage Linked Groups’ . From the pop-up you can add or remove groups. From the Schedule you can also Add and view other Schedules attached to this group.


