The Settings -> Job Settings area allows you to configure job settings in order to collect additional information when users create New Jobs and Completed Jobs.
Select Edit to make your changes
and Save once you are finished
![]()
New Jobs Settings
- Job Type – Make the job type and sub type required fields in the Required section or have as optional in Additional Information.
- Job Category – Make the job category required fields in the required section or have as optional in Additional Information.
- Expected Date Or Job Priority – Choose whether to ask for the job priority, expected start date or expected complete date.
- Ask for Team or Assigned User – Choose whether to ask for an Assigned User or Team in the new job page.
- Ask For Job Duration and Number of Resources – Choose whether to ask for the expected job duration and number of resources in the new job page.
- How to set Job Contact when Job Created – Choose whether the contact information for the Job is the main site contact or the Assigned user contact.
- Ask For Single Asset – When creating a Job, Users can select an asset.
- Ask For Contract – When Adding a Job, Users can select a contract before selecting a Site.
- Ask For Order Number – When creating a Job, Users can enter an order number.
- Auto Select Resource – When creating a Job, Users can set this to automatically choose, choose and instruct a resource or neither.
- Enable Request For Quote – When this setting is Enabled a new tab will appear when creating a new Job. “New Job With Quote”. This will create a new Job but automatically request for a quote.
- Show Location and Sublocation in “Required” section – When this setting is Enabled the Location and SubLocation dropdowns will appear in the required section, rather than the Additional Information Section.
- Can Create New Site While Creating Job – While adding a job the user can create a new site quickly.
Completed Jobs Settings
- Ask for Job Sub-status when jobs are completed – Choose whether to ask for job sub-status when completing the job.
- Out of Service Enabled for Jobs – On each job, you can enable the recording of Out of Service and In-Service Date / Time Stamps. Useful for production and manufacturing environments, for example to record that a line has been out of service as a result of a reported issue.
- Send Email to site contact on Job or Task Completion – Choose whether to send an Email to the Site Contact when the Job or Task is complete.
- Additional Questions Template – Create additional questions that will appear in the Job Completion window when the user completes a job. You can create your own template, and add additional questions by selecting the +New Template as shown below. You can control which template to use for different jobs, you can also control which template is available for specific sites when creating a new template.
Permit to Work Settings
- Turn on Permit to Work Within Application – When enabled this will give the option on a job or job task to require a permit. Once a job or job task requires a permit then a document must be uploaded before a job can be instructed or completed. For a resource to accept or complete a job task then they must read and agree to the permit.
- Permit Type – This will determine whether documents or forms are used for the permit to work.
- Permit to Work Disclosure Text – This text will be displayed when a resource or user is agreeing to the permit.
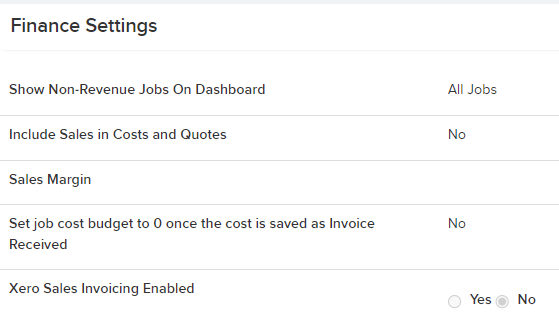
Finance Settings
- Include Sales Information in Costs Area – When enable Sales info will be included in the Costs area.
- Expected Sales Margin – This is the Expected percentage Sales Margin
- Xero Sales Invoicing Enabled – When enabled Sales invoicing will be integrated with Xero
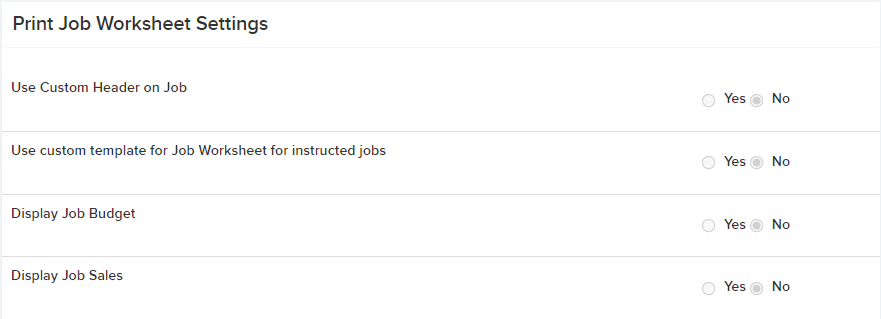
Print Job Worksheet Settings
- Use Custom Header on Job – You can design your own header using HTML and include tags to include your logo and job information. Tags include: [ClientLogo], [JobNumber], [SiteName], [SiteCode], [SiteContact], [SiteFullAddress], [PostCode], [ExpectedDate], [ContractName], [JobDetails]
- Use custom template for Job Worksheet for instructed jobs – You can design your own PDF using HTML for the job worksheet that is sent to resources for instructed jobs. Tags include: [ClientLogo], [JobNumber], [SiteName], [SiteCode], [SiteContact], [SiteFullAddress], [PostCode], [SiteTown], [ExpectedDate], [ContractName], [Priority]
- Display Job Budget – You can display the job budget on the default job worksheet.
- Display Job Sales – You can display the job sales value on the default job worksheet.
Print Job Task Worksheet Settings
- Use Custom Header on Job Task You can design your own header using HTML and include tags to include your logo and job information: [ClientLogo], [JobNumber].
Print Sales Quote Settings
- Use Custom Header on Sales Quote You can design your own header using HTML and include tags to include your logo and job information: [ClientLogo], [ClientLogoAlt].
- Use Custom Footer on Sales Quote You can design your own footer using HTML and include tags to include your logo and job information: [ClientLogo], [ClientLogoAlt].
Other Settings
- Days To Retain Completed Jobs –Decide how long you want to retain completed jobs in the Resource and Manager App
- Jobs Calendar – Completed Jobs Appear By Date Completed – Set to Yes and Completed Jobs will Appear By Date Completed on the Jobs Calendar otherwise the date the job was due.
- Set the due date to – The job due date is assumed to be the expected start date for the job. But you can change this so that the job due date relates to the expected complete job for the date. The due date is shown on the job page and is also used in dashboards, and asset and site list summaries when calculating whether or not jobs are overdue.
- Reason already instructed job reallocated – These options will be available in the Jobs details page when resetting a Resource


